Setting up tinyauth with Nginx Proxy Manager
Nginx Proxy Manager is definitely a piece of software that everybody loves in the homelab community. This is why it is mandatory that tinyauth supports it. It's a bit different compared to traefik/caddy due to nginx itself not supporting 302 redirects for the auth_request module but tinyauth accounts for it and has API paths made just for it!
INFO
This tutorial assumes you have some experience with Nginx Proxy Manager.
Example docker compose file
Throughout this tutorial we will use the following docker compose file:
services:
  npm:
    container_name: npm
    image: jc21/nginx-proxy-manager:2
    restart: unless-stopped
    ports:
      - 80:80
      - 443:443
      - 81:81
    volumes:
      - npm-data:/data
      - npm-letsencrypt:/etc/letsencrypt

  nginx:
    container_name: nginx
    image: nginx:latest
    restart: unless-stopped

  tinyauth:
    container_name: tinyauth
    image: ghcr.io/steveiliop56/tinyauth:v3
    restart: unless-stopped
    environment:
      - SECRET_FILE=/secret.txt
      - APP_URL=http://tinyauth.example.com
      - USERS=user:$$2a$$10$$UdLYoJ5lgPsC0RKqYH/jMua7zIn0g9kPqWmhYayJYLaZQ/FTmH2/u # user:password

volumes:
  npm-data:
  npm-letsencrypt:
You can configure OAuth and access controls as you normally would with docker labels and environment variables, all the configuration will happen through the UI.
Configuring Nginx Proxy Manager
Firstly we need to create the tinyauth host, it is really simple as we have to configure it as every other host:
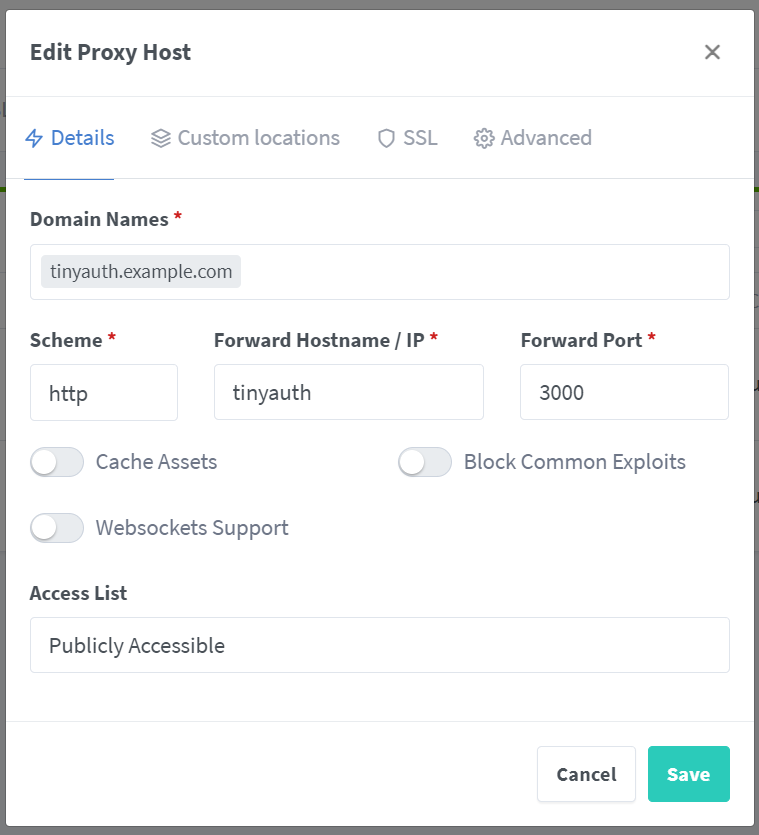
You can also setup your SSL if you are using certificates.
WARNING
Make sure that block common exploits is disabled. If it is enabled nginx will not allow URLs in the query parameters which is required for tinyauth to function.
Now we need to configure our protected hosts, in this case it is nginx. For the Details tab we will fill it as we did with tinyauth which looks like this:
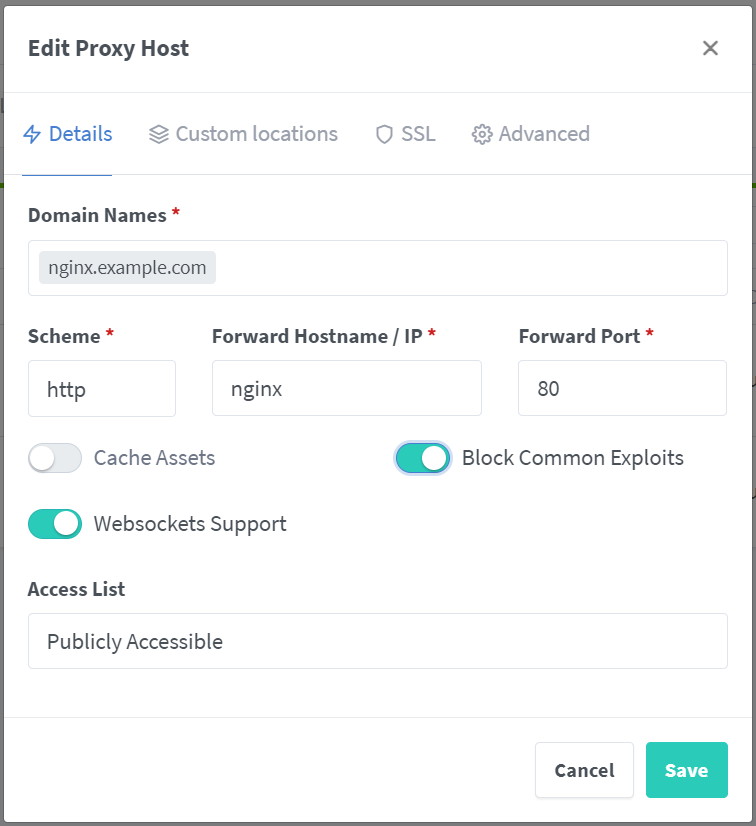
Again, you can configure your SSL as you like.
INFO
Here you can keep the block common exploits enabled.
Now for the important part. You need the following config in the Advanced tab in order for nginx to use tinyauth to authenticate:
# Root location
location / {
  # Pass the request to the app
  proxy_pass          $forward_scheme://$server:$port;

  # Add other app specific config here

  # Tinyauth auth request
  auth_request /tinyauth;
  error_page 401 = @tinyauth_login;
}

# Tinyauth auth request
location /tinyauth {
  # Pass request to tinyauth
  proxy_pass http://tinyauth:3000/api/auth/nginx;

  # Pass the request headers
  proxy_set_header x-forwarded-proto $scheme;
  proxy_set_header x-forwarded-host $http_host;
  proxy_set_header x-forwarded-uri $request_uri;
}

# Tinyauth login redirect
location @tinyauth_login {
  return 302 http://tinyauth.example.com/login?redirect_uri=$scheme://$http_host$request_uri; # Make sure to replace the http://tinyauth.example.com with your own app URL
}
INFO
The /tinyauth path can be anything, the guide uses this name for convenience.
INFO
You may need to add additional configuration under the / location for technologies like websockets to work.
Now we can save the host and when you try to access it you should be redirected to the tinyauth login page if you are not already logged in. Keep in mind you will need to do this for every host you want tinyauth to protect.